How To Make An Iron Farm In Minecraft
Learn how to make an iron farm in Minecraft for unlimited iron. Easy step-by-step guide with tips for Java & Bedrock.
Why Build a Minecraft Iron Farm?
If you've ever played survival mode for more than an hour, you know iron is life in Minecraft. From tools and armor to hoppers and rails, you need tons of it. Mining iron ore works early on, but it's slow and boring. That's where the Minecraft iron farm comes in--a clever setup that spawns iron golems automatically, kills them, and funnels iron straight into your chest.
For all of the ways to find iron in Minecraft we have the perfect guide for you, but if you've ever Googled "how do you make an iron farm in Minecraft", you're in the right place. This guide walks you through how to make an iron farm in Minecraft step by step, with tips for maximum efficiency.
How Do Iron Farms Work in Minecraft?
Iron farms take advantage of villager panic mechanics. Here's the simple breakdown:
-
Villagers spawn iron golems when they feel threatened (by a zombie) and have beds.
-
Golems spawn on solid blocks near villagers.
-
If you kill golems automatically and collect drops, you get a renewable iron source.
Each iron golem drops 3-5 iron ingots and 1 poppy, so your farm can churn out hundreds of ingots per hour once set up.
What You'll Need
Before we start, gather these materials:
-
3 villagers (more villagers = faster spawns)
-
1 zombie (to scare villagers)
-
3 beds
-
Solid blocks (200+ for platforms and walls)
-
Water buckets (x2)
-
Lava bucket (x1)
-
Hoppers (x4)
-
Chest (x1 large chest)
-
Signs (x3)
-
Optional: Name tag (to stop the zombie from despawning)
Step 1: Pick a Location
-
Choose a flat area at least 64 blocks away from any village.
-
Make sure the farm is at least 10-12 blocks off the ground so golems don't spawn on the ground.
Step 2: Build Villager Pod
-
Build a 7x7 platform in the air.
-
Place 3 beds inside.
-
Add walls or glass blocks around the platform so villagers can't escape.
-
Light up the area with torches to prevent hostile mob spawns.
Step 3: Add a Zombie Chamber
-
Create a small cage near the villagers (within 8 blocks).
-
Trap the zombie inside with blocks or a boat.
-
Place a name tag on the zombie so it doesn't despawn.
-
Make sure villagers have line of sight to the zombie to stay "scared."
Step 4: Create the Iron Golem Spawn & Kill Area
-
Build a spawn platform around the villager pod (8x8 works great).
-
Add water buckets in opposite corners so water flows toward a 2x2 hole in the center.
-
Below that hole, build a kill chamber:
-
Place hoppers connected to a chest.
-
Add three signs above the hoppers.
-
Place lava on the signs so it stays suspended.
Now, when golems spawn, water pushes them into lava. They die, drop iron, and hoppers collect it automatically.
Step 5: Transport Villagers & Zombie
-
Use boats or minecarts to move villagers into the pod.
-
Wait for night so they claim beds.
-
Lead a zombie into its chamber carefully (trap doors help).
Here is Another Iron Farm Layout Example
With a similar amount of materials, you can experiment with different types of farm layouts that work for you. Here's how to build another great Iron Farm Layout that is super efficient!
Create a villager panic room
- Dig a 5x7 foundation for the villager chamber.
- Allow a 3x3 room for villagers, with 3 beds on the inner side
- And a 1x3 room for the zombie
- Wall up by 3 blocks.
- Making sure to build a 'beam' between the 3x3 room and the 3x1 room (this will be important later)
- And leaving either doors or temporary blocks on each side of the 3x1 room
- Light up the interior to stop mobs spawning.
- Lure 3 villagers into their room by using a workstation. (Barrels are an easy option).
- Create a temporary staircase into the room, place workstations inside and nudge them into place.
- Remove the workstations once they're safely inside.
- Place a roof across the whole 5x7 chamber.
- Leaving 3 temporary blocks on the 3x1 Zombie chamber side for later.
- Path the entire area for 8 blocks outwards from each side of the farm.
- This will stop Golems from spawning outside of the dedicated spawn area.
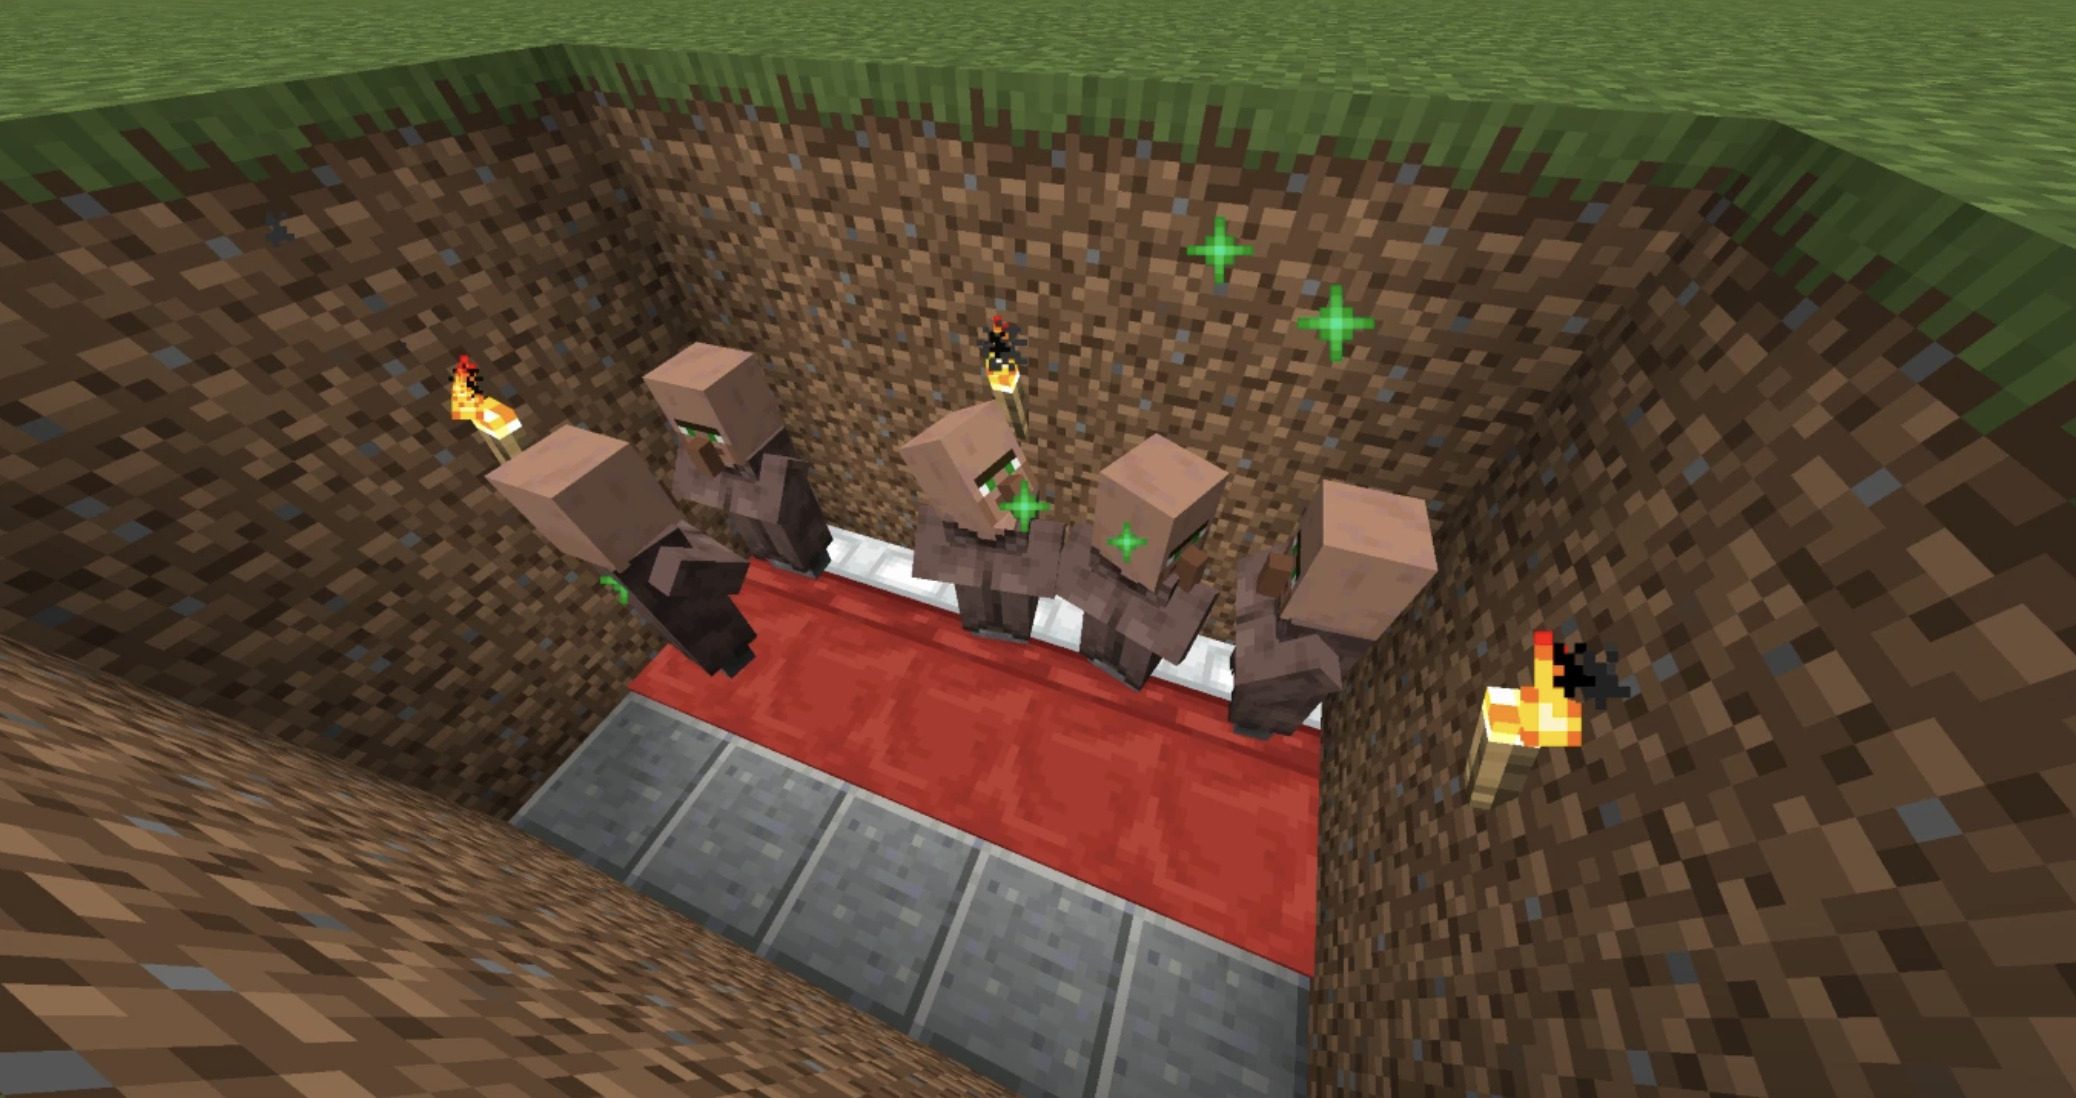
Create an Iron Collection System
- Dig out a 5x5 square on the back wall of the Villager panic room. (The side with the temp blocks).
- Dig out by 2 more blocks on one side and place your iron collection chest.
- Fill the 3x3 area in the center with hoppers, taking care that they all lead back to the chest.
- Wall up to match the height of the rest of the farm (4 blocks).
- You can use glass here to watch your farm working later!
- Replace the 3 temp blocks on the roof with stairs leading down into the collection chamber.
- Make sure these are non-flammable, along with the rest of the blocks!
- Line the edge of the whole roof with a wall made of 1 block + 1 slab in height.
- This will stop the Golems from jumping out & stop them from spawning on top of the walls.
- Place signs to control the flow of the water and lava.
- Place 3 signs on the front of the stair blocks (not on top)
- Place 2 signs stacked on top of the middle hopper (to make a tower of 2 signs high)
- Place the remaining signs to match the screenshots (3 on 2 sides, 1 on the other 2 sides)
- The goal is to create a static 1x1 lava pool 2 blocks above the hoppers & to stop the water from pouring into the lava.
- Place your water and lava.
- Place the lava on top of the 2 sign stack in the middle of the hopper chamber
- Waterlog the 3 stair blocks to create a smoother edge for the Golems to fall over.
- Place 3 water sources on the fair end of the roof to create a water funnel into the lava & hoppers.
- Prepare the Zombie room.
- Place 3 trapdoors on the bottom of the beam we built earlier (between the 3x3 Villager room and the 3x1 Zombie room)
- Lure a zombie into this 3x1 room.
- Place a nametag on the Zombie to prevent it from despawning.
- Wait!
- The farm should now start producing iron Golems, killing them in lava and dropping the iron into the hoppers for easy harvesting!
How to Optimize Your Iron Farm
-
More villagers = faster spawns. Add extra pods if you want higher output.
-
Build AFK platform: Stay within 32 blocks so the farm stays active.
-
Spawn-proof the area: Use slabs, carpets, or light to stop random iron golems from spawning elsewhere.
Common Questions
How many villagers do I need?
Minimum 3 villagers, but 10+ improves spawn rates dramatically.
How much iron can I get per hour?
A simple farm with 3 villagers makes 200-300 iron per hour. Larger farms can exceed 1,000 per hour.
Does this work in both Java and Bedrock?
Yes, but Bedrock requires 10 villagers and 20 beds for golems to spawn consistently.
Why Not Build This on Your Own Server?
Learning how to make an iron farm in Minecraft is a game-changer. It saves hours of mining and sets you up for mega builds, beacon pyramids, and endless hoppers. With just a few villagers, a zombie, and some basic resources, you can create an automated iron machine that never stops giving.
So what are you waiting for? Grab those blocks, trap a zombie, and get farming. Happy crafting!